
Beast Sensor review: Get stronger, better, faster, and now
At $250, this device is only good for one thing – getting pumped up. And that’s okay.
Many fitness trackers still aren’t suitable to a gym atmosphere. While the Atlas Wristband and others try to push the category as a whole forward, the Garmins & Fitbits of the world are still cardio focused, and tacking “weight training” trackables on the end. The $250 Beast Sensor is aimed at gym-goers, and weight-room junkies specifically.
The Sensor is a small module attached to your wrist, back, or gym equipment, and it will measure atypical metrics like power, speed, and more. The Beast Sensor is built on velocity-based training principles, a type of workout only a select few will be able (and want) to use. After spending time in the gym with the Sensor, I found it capable, but only certain people will find it truly invaluable.
Design: Small sensor, big power.
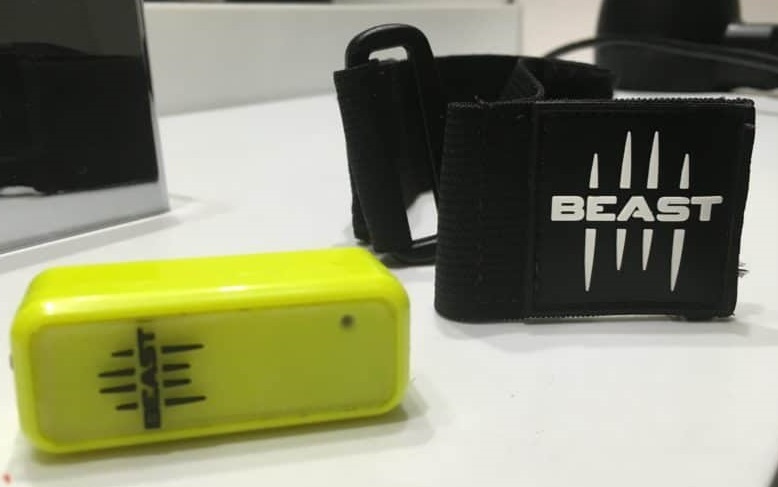
Pseudo-intimidating name aside, the Beast Sensor is diminutive. A 2-inch long neon yellow module holds 3 gyroscopes, 3 accelerometers, 3 compasses, and a lithium ion battery. The company logo is in black, and a small light flashes when properly connected to your phone via Bluetooth, or when charging via microUSB. It’s also magnetic, so can be attached to its wristband, or gym equipment.
It both feels weighty in hand, and undetectable in the wristband. The wristband is a simple – black, stretchy, and can be secured via Velcro. The open-ended pocket also features a magnet to prevent it falling out.
The Beast Sensor is in the same category as the $250 Atlas Wristband, with both emphasizing weight training. While the Atlas uses a PMOLED display and focuses on counting reps, the Sensor uses accompanying algorithms & module design track performance & velocity. After recording workouts, it provides velocity-based-training (VBT) feedback, a way of using speed to determine how much to lift daily, depending on end goals.
For example, if aiming to increase strength: under VBT, on a day you feel energized to lift quickly, you would increase weight to slow yourself down and maximize your gains per rep. The Beast app has a simple VBT explainer, as does its blog.
Specifics of how the Beast works in relation to VBT follow below, but the design is consistent with its intended purpose. Unlike the Atlas, the Beast Sensor can be moved around: on the wrist for bicep curls, on the weights for leg presses, or on your back (via Beast Vest) for pushups or pull ups. The sensor seems less user friendly due to a lack of controls on the module, but it’s plenty versatile.
Features: Make the weight room yours
The Beast Sensor combines user information, along with tracking & algorithms to judge how hard you’re working out. First, however, be sure to be doing exercises it can track. The app has a list of trackable moves, but you can add others too. I added the hip abduction machine after my first taking the Sensor to the gym. After attaching to the leg rests, I started my workout only to find no reps being picked up by the sensor.
For the Beast Sensor, placement is key. Better luck was had after placing the sensor on the weights in the machine. This method also worked on the abdominal curl & bicep curl machines. As the weights moved up & down, the reps were captured (you can follow along live in the opened app). It also captured my speed in m/s, and power, in watts, changed after every rep.
Similar happened with dumbbells. Depending on dumbbell size, I placed the Sensor to the side of my hand, or beneath, to be grasped along with the weight.
Some exercises can’t be accurately measured without the Beast Vest, allowing you to attach the Sensor to your back. With the Sensor in a wristband, no reps were recorded for push-ups. Although easy to stick in different places, you need to give thought about positioning before you can achieve accurate readings. The Beast Sensor is similar to the Atlas in this regard.
Another similarity is their ability to be tripped up occasionally. Unlike the Atlas missing reps, my Sensor would add a few extra reps during workouts sometimes. At most, this was 1-2 extra.
There are 5 tracking modes: Performance Tracking (monitors movement), Hypertrophy (bulking up muscle, strength & size), Max Strength (increasing force outputted), Power (perform under ideal strength & speed to maximize power), and Velocity (increase speed of movements.)
Although confusing at first, after breaking each mode down, it’s easy to choose the one appropriate for your goals. Each mode in the app has a question-mark bubble which provides an explanation. However, instead of catchy taglines beneath each mode title, I’d prefer simple descriptors so newbies could avoid searching for basic info.

